Initial Configuration
First, I recommend following the Macminicolo guide to get your Lion VPN up and running.
Once the VPN service is up and running, I strongly recommend you verify VPN connectivity with a Macintosh client computer. This is to ensure that everything is configured correctly within Lion, as Windows 7 tends to give the mistaken impression that there are configuration issues within your server’s VPN during the initial setup period. This is due to the way that Windows handles IPSec NAT traversal by default. If this is not possible, make sure to carefully follow these instructions, and you should be okay.
Configure Windows 7
- From the Windows 7 client, open up the Start menu and navigate to your Control Panel.
- Select “Network and internet” from the available categories.
- Click on “View network status and tasks”.
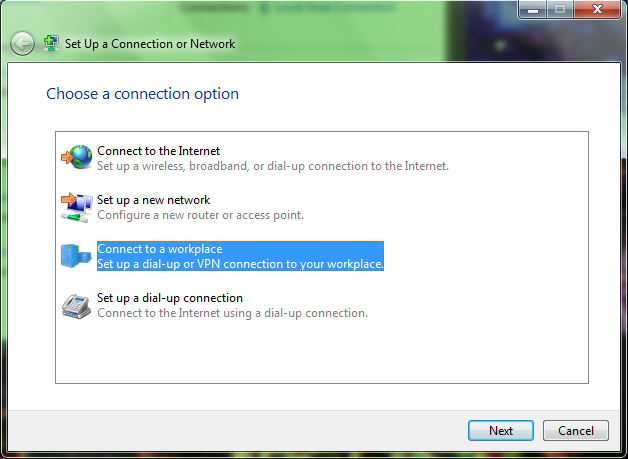
- Click on “Set up a new connection or network”.
- Choose Connect to a workplace from the pop-up window.
- If prompted with the question “Do you want to use a network connection that you already have?” elect “No, create a new connection”.
- Click “Use my Internet connection (VPN)”.
- Type the internet address of your Lion VPN server in the top box on the next screen.
- Title your VPN Connection as well, something like “Your Company Name VPN”.
- At the bottom of the window, choose the check box “Don’t connect now, just set it up so I can connect later”.
- Type in the user name and password you configured during the initial configuration.
- You can leave the domain field empty in most cases.
- Select the “Connect Now” button.
- Do not be alarmed if your VPN does not connect immediately, as Windows 7’s default IPSec NAT traversal behavior may not be aligned with Lion server’s expectations.
Final Configuration (if VPN does not connect after the above steps)
- Return to the Network and Sharing center screen.
- It should still be visible on the screen, but you can get to it from your Control Panel if need be.
- On the far left of the window, select “Change adapter settings”
- Double click on the connection you titled earlier in this tutorial.
- Make sure the user name and password fields are filled out.
- Click “Properties” at the bottom of the VPN connection window.
- Ensure your Lion server’s IP address is filled out under general.
- Click the “Security” tab
- Select the radio button labeled “Use preshared key for authentication”
- type your Lion server VPN shared secret here.
- Select “OK”
- Under “Type of VPN”, choose “Layer 2 Tunneling Protocol with IPSec (L2TP/IPSec)”
- If this is not a visible choice, you may need to modify your registry. I am including a link to Apple’s HT5078 article to resolve this, but please do make sure you back up your registry first!
- Click the “Advanced settings” button.
- Under “Data Encryption”, choose “Require encryption (disconnect if server declines)”.
- Under Authentication, choose “Allow these protocols”.
- Tick the box for “Microsoft CHAP version 2 (MS-CHAP V2)”.
- Ensure that NO OTHER PROTOCOLS are selected.
- Click “OK”.
- Double-click on “Your Company VPN” under “Network Connections”, and it should connect right up!
There you go, you’re done!
Of course, if you have any trouble with this, please do not hesitate to contact your experts at MacWorks.